Sunday, December 20, 2015

Holiday Gifts for Grillers - Part 3

With the holidays fast approaching, have you figured out what to ask Santa for? We'll be sharing a few of these with you this month :)


7. Marinade Spray Bottle - Stainless steel - all fancy!


8. Grillight - A spatula with LED light on it - what WILL they think of next??


9. Pizza Stone for the Grill - Remember that Homewrecker BBQ Chicken Pizza?


10. Brush & Bowl - Only difficult thing about BBQ is that it's messy, this apparatus might help.
 

Sunday, December 13, 2015

Holiday Gifts for Grillers - Part 2

With the holidays fast approaching, have you figured out what to ask Santa for? We'll be sharing a few of these with you this month :)


4. Wing Rack - where has this been my whole life??


5. Magnetic Tank Reader - for folks with Propane Tanks. Great stocking stuffer.


6. Meat Claws - for shredding your porks, chickens, steak/beef, etc. Plus they're called 'MEAT CLAWS'...how awesome is that?

Sunday, December 6, 2015

Holiday Gifts for Grillers - Part 1

With the holidays fast approaching, have you figured out what to ask Santa for? We'll be sharing a few of these with you this month :)


1. Grillbots.com - that's right, a Roomba for the grill!


2. Jalepeno Popper Grill Rack - We may have to do a series on this next season :)


3. Garlic roaster for the Grill - Oh man, I need to send a letter to Santa!!


Sunday, November 29, 2015

Grilled Homewrecker Holiday Ham

Many years ago, I was home with my family for Easter - we were leaving for church and turned on the oven to pre-heat, mom was going to be making ham for the family coming over later.

We got home from church and the oven was cold...broke. Now what do we do?

Thinking quickly, she fired up the grill and we had grilled ham!

So - why not brush the leaves and snow off your grill and use it to make a unique Holiday Ham?


Here is a simple example to get you started:

Grilled Holiday Ham with Homewrecker BBQ Glaze

1 ham, spiral cut or not (any size will do - this example is for about 9 lbs)
1 cup honey
1 Tablespoon A-1 sauce
1 Tablespoon Homewrecker BBQ Sauce 
Cloves (optional)

Pre-heat the grill to 300 degrees, follow the cooking instructions that come with your ham.

Mix together the glaze (honey, a1, and Homewrecker bbq sauce).
If you are using a regular ham score your meat with criss cross cuts.  Not too deep, maybe 1/2-1" (you can add cloves at this time if you're into that kind of thing).  Place ham, large side down, on side the coals or flames aren't.  We want to use the indirect heat method. Brush on  a little bit of the glaze.  Don't get too crazy or it will all slide off into the bottom of the grill.

Every 10-15 minutes turn the ham and glaze some more.
If you have a spiral ham lift your slices a little bit or tip the ham back so it opens a little and apply some more glaze. 

Cook as directed in the instructions that come with the ham from a timing perspective - enjoy with the rest of your holiday meal!

Sunday, November 22, 2015

Grilled Apple Pie: Just in time for The Holidays!

Straight from the BBQ Pit Boy Youtube page:

Grilled Apple Pie - just in time for the holidays!


Ingredients:

Baking Apples - 8
Lemon – 2 tsp juice
Premade Pie Dough
Butter – 1 tsp
Sugar – 1 cup.
Butter – 2 tsp.
Cinnamon – ¼ tsp
Nutmeg – 1/8 tsp
Salt – 1/8 tsp
Pyrex oven safe pie pan

1. Set up your grill for indirect grilling. Place hot coals on 1 side of the grill and no coals on the other side of the grill. You are looking for a temperature of 425 degrees Fahrenheit.
2. Core and peel the baking apples
3. Slice the apples into ¼ to 3/8 inch slices
4. Place apples in a bowl and set to the side
5. In a second bowl mix;

1 cup of sugar
1 Tbsp. of Flour
1/8 tsp of Salt

6. Slowly pour the sugar, flour, & salt mixture over the apples mixing to coat all the apples
7. Add to tsp of fresh Lemon Juice to the apples and mix
8. Unroll a pie crust and place into the pie pan
9. Spoon the apple mixture on top of the pie crust in the pan
10. Sprinkle 1/8 tsp of Nutmeg on top of the pie filling
11. Sprinkle 1/8 to ¼ tsp of cinnamon on top of pie filling
12. Place dots of butter on top of the filling, using about 1 tsp of butter
13. Cover the pie with the top pie crust
14. Seal both pie crusts together around the edges (fluting)
15. Score 4 slits in the top pie crust, Do not cut all the way thru the crust
16. Sprinkle light cane sugar on top of the crust
17. Place the Pie on the side of the grill with no coals (indirect grilling)
18. Cover the grill with the lid
19. Cook time will be about 45 minutes depending on the temp of your grill
20. After 20 minutes rotate the pie 180 degrees to promote even cooking
21. After 45 minutes or when done, remove the pie from the grill
22. Let the pie rest and cool down

Video here.

Sunday, November 15, 2015

Grilled Brussel Sprouts with Bacon & Balsamic

Grilled Brussel Sprouts with Bacon & Balsamic - from Daring Gourmet on Tablespoon.com:

Grilled Brussels Sprouts with Bacon and Balsamic

Ingredients

1 1/2 pounds fresh Brussels sprouts (outer leaves discarded, bottom stems trimmed), cut in half
3 tablespoons extra virgin olive oil
Salt
Freshly ground black pepper
1/3 cup good quality aged balsamic vinegar
4 slices thick-cut bacon, cooked and crumbled 
 

Directions

  • Preheat it to medium-high.
  • Lay the Brussels sprouts in a single layer on a non-stick or lined baking sheet. Drizzle a couple tablespoons of extra virgin olive oil over the sprouts, sprinkle with some salt and freshly ground black pepper, and toss to evenly coat. Place the Brussels sprouts on a grill rack and grill for 8-10 minutes on each side.
  • While the Brussels sprouts are cooking, place the balsamic vinegar in a very small saucepan and bring it to a boil. Reduce the heat to medium-low and simmer uncovered for about 15 minutes or until it is thickened and lightly coats a spoon.
  • Arrange the Brussels sprouts on a serving platter, drizzle with the balsamic vinegar reduction and sprinkle with the crumbled bacon. Serve immediately.
 

Sunday, November 8, 2015

Avoiding dry bird meat - just in time for Thanksgiving!

3 great tips borrowed from The Mamas Girls blog:

3 Steps to Never Grill Dry Bird Again!


1. Use a Jaccard Tool

How many of you even know what a jacaard tool is? I sure didn’t. It is, essentially, a small hand-held kitchen tool that tenderizes meat. Depending on the type, they can have anywhere from 15 to 50 tiny blades that pierce the meat with many holes. This does a few things to help the end result. It forms tiny channels through the meat which heat can pass though. This means more even cooking, less shrinking, and can yield faster cooking times. These channels also allow juices and marinades to flow through. Tenderizing before using a marinade can allow flavors to penetrate deeper into the meat. This means more a flavorful result! 

2. Brine the chicken

Many of you have probably heard of brining a turkey for Thanksgiving. Many of you probably dismissed the idea because you were afraid of messing it up and ruining Thanksgiving dinner, and having to order take-out on the most important meal of the year. Some of you just said, “what ever it is, isn’t worth the extra hassle of an already long day in the kitchen”. NOT TRUE! A brine has an acidic quality which tenderizes the driest of meats. Turkey, like chicken, is high on the dry scale. A brine also infuses flavor into the meat. It is basically just a marinade.  Now are you warming up to the idea? Here is the brine recipe:

8 c. water
1/2 cup light brown sugar, packed
1 T. black peppercorns
1/4 cup kosher salt
2 sprigs fresh thyme
1 T. lemon juice
3 whole bay leaves
4 cloves garlic, sliced
Stir ingredients together in a large pot and bring to a boil. Continue stirring until sugar is dissolved. Allow to cool until room temperature. ( I try to make the night before if I remember) After cooling the marinade, place meat or poultry in a Ziploc bag inside another container for support and leakage. Pour cooled marinade into the bag and squeeze out as much air as possible. Seal. Refrigerate for 3-4 hours
Discard brine before using.   Make sure to pat chicken dry. Grill chicken until inside  temp reaches  165° F.

3. Let the Meat Rest

I know you’re anxious to dive into this delicious piece of meat, and to experience what the meat tenderizer and the brine have done, but leave it alone for 10 minutes after you take it off the heat. Don’t poke it, don’t prod it , don’t cut into it.  If you’re worried about it being cold when you serve it, place it on tin foil, and cover it. This allows the fibers to relax and settle into that mouth watering tenderness.

Sunday, November 1, 2015

Bacon Wrapped, Goat Cheese Stuffed, Grilled Mushroom Tops

Bacon Wrapped, Goat Cheese Stuffed, Grilled Mushroom Tops


Ingredients:
12 large baby portobello mushrooms
4 oz. cream cheese, softened
2 oz. goat cheese, crumbled
salt
pepper
1 tsp sriracha
6 slices bacon

Instructions:
1. Preheat oven to medium heat. Grease the grill lightly.
2. Clean tops of mushrooms with a damp cloth and remove stems.
3. In a small bowl, mix cream cheese, goat cheese, salt, pepper and sriracha together.
4. Divide cheese mixture evenly into mushroom cavities.
5. Cut each slice of bacon in half. Wrap around mushroom and place a toothpick into the mushroom where the bacon ends overlap. {Make sure the toothpick is sticking out the side and is not in the top or bottom.}
6. Grill mushrooms 5-7 minutes per side or until bacon has grill marks, is slightly crispy, and the filling has melted.
7. Remove from grill, remove toothpicks and serve hot.

Sunday, October 25, 2015

Grilled Rumchata Bread Pudding


Grilled Rumchata Bread Pudding


2 C granulated sugar
5 large beaten eggs
1 C milk
1 C RumChata
2 t pure vanilla extract
3 C cubed Italian bread--allow to stale overnight in a bowl
1/2 C packed light brown sugar
1/2 tsp cinnamon
Optional: peaches or berries

Whisk eggs, milk, Rumchata, sugar and cinnamon in a bowl. Add bread cubes; soak 30 minutes. Butter a sheet of nonstick foil and add the bread mixture; form a packet. Grill over indirect heat, turning a few times, 35 minutes.

Serve warm - great with ice cream too :)

Sunday, October 18, 2015

Fireball Whiskey Grilled Pumpkin Pie

Direct quote to BBQ Pit Boys' epic grilled dessert:

Fireball Whiskey Grilled Pumpkin Pie


Ingredients:

Frozen Pie Crusts – 2 (9” each or make your own )

Pie Filling:
Pure Pumpkin – 1 can, 30 oz.
Evaporated Milk – 1 ½ cans, 18 oz.
Eggs – 4
Sugar – 1 ½ cups
Salt – 1 teaspoon
Ground Ginger – 1 teaspoon
Ground Cloves – ½ teaspoon
Cinnamon Whiskey – 6 oz.

Instructions:

1. Bring grill temperature up to 400 degrees Fahrenheit.
2. Follow directions on package of frozen pie crusts.
3. Using a fork, poke small holes all around pie crust.
4. Place pie crusts on grill opposite hot coals for 15-20 minutes. Cover grill.
5. Be sure to follow cooking times on the package of your frozen pie crusts.
6. Remove crusts from grill and reduce heat to 325 degrees Fahrenheit.
7. Crack eggs and put in a mixing bowl.
8. Whisk and combine sugar, salt, ground ginger, ground cloves, pure pumpkin, evaporated milk, and cinnamon whiskey.
9. Thoroughly mix ingredients.
10. Pour mixture to the top of each pie crust.
11. Grill temperature should be 325 degrees Fahrenheit.
12. Place pies on grill opposite hot coals.
13. Cover grill and cook for 25-30 minutes.
14. After 25-30 minutes, remove cover and rotate pies a half turn for even cooking.
15. Cover grill and cook for another 20-25 minutes.
16. Remove cover and check pies for done-ness. Place a tooth pick into center of each pie and remove. If they come out clean, pies are done. If the pie sticks to toothpick they are not done. Continue cooking until you get a clean toothpick. If you don’t have a toothpick, use your Old Hickory knife to check.
17. Set pies on cooling rack to cool down.

Video here

Sunday, October 11, 2015

Grilled Cinnamon & Caramel Stuffed Apples


Grilled Cinnamon & Caramel Stuffed Apples


Ingredients:

4 granny smith (or other tart) apple, cored
1 tsp ground cinnamon
2 tbsp brown sugar
2 tbsp butter (melted but not hot)
4 square caramels, unwrapped

Combine cinnamon, brown sugar, and butter. Place cored apple on aluminum foil (that you'll be wrapping it in before cooking), pack core about 1/3 full with brown sugar mixture, add unwrapped caramel, top off core with mixture and pack tightly in the foil.

Place on BBQ or in bonfire for 5-10 minutes. Remove and let cool for a bit before eating - be aware the sugar is REALLY hot.

Enjoy - great if you unpack the foil into a bowl and serve with vanilla icecream.

Sunday, October 4, 2015

Dish to Pass: Spicy Crock Pot Homewrecker BBQ Kielbasa

Inspired by: tammileetips.com

Spicy Crock Pot Homewrecker BBQ Kielbasa

Crock Pot Kielbasa

Ingredients:

2 1/2 cups Homewrecker BBQ Sauce
2 tsp horseradish mustard
1 tsp hot suace
1 medium onion, finely chopped
1/2 cup bourbon
2 lbs kielbasa cut into 1/2 inch rounds

Instructions:

1. Combine all ingredients in the crock pot
2. Cover and cook on low for 4-5 hours, until sausage is hot


The Spicy Barbecue Kielbasa can be served in a bowl with toothpicks on the side or individually on a plate. These kielbasa are a bit sticky and have quite a bit of sauce. I would make sure you have extra napkins available near them.

Sunday, September 27, 2015

Homewrecker BBQ Chicken Bacon Wraps - YUM!

This is inspired by 101cookingfortwo

Homewrecker BBQ Chicken Bacon Wraps - great for football parties and tailgating!


Ingredients:

  • 1¼ pounds skinless boneless chicken breasts cut into 1 inch cubes
  • 1½ pounds bacon
  • Toothpicks
  • Homewrecker BBQ Rub
  • ½ cup brown sugar
  • Homewrecker BBQ Sauce (for dipping)

Instructions:

  1. Preheat oven to 350 convection. In a large mixing bowl, combine brown sugar & Homewrecker BBQ Rub, mix well.
  2. Clean and trim about 1¼ pounds of skinless boneless chicken breast. Cut into approx. 1 inch cubes.
  3. If using thick bacon, thin out with the back edge of a chef knife. Cut the bacon in half, roll around the chicken cubes and secure with a tooth pick. This is the point to cover and refrigerate for better timing.
  4. Prep baking sheet with aluminum foil a rack and spray with PAM.
  5. Roll the pieces in the brown sugar mixture. Be sure to pack some in the ends. Place on the rack.
  6. Bake until golden brown. About 35 minutes for me. Cover with foil on heavy dish to keep warm until served.
  7. Can toss in Homewrecker BBQ sauce, or just have some on the side for dipping.

You could also do these on the grill - just make sure they're done all the way!

Sunday, September 20, 2015

Grilled Homewrecker BBQ Chicken Pizza!

Who is excited for Football season? THIS GIRL!!

I've got a bunch of fun and informative things in store for us before we get into the holidays...who's ready for fall grilling?


Let's start with how to grill a pizza...I see some Homewrecker BBQ chicken pizza in your future...


Ingredients:

Pizza Dough (you can use prepared or make your own, my fav recipie is here)
Olive Oil
Homewrecker BBQ Sauce (about 1/2-1 cup, it will be your sauce on the pizza)
2 cups Chicken (grilled & diced or shredded)
Red onion (small, chopped, raw)
1/2 lb bacon cooked & crumbled
2 cups Mozzarella cheese

Instructions:
  • Make the pizza dough or use prepared pizza dough.
  • Prepare the grill for high direct heat. Prepare a small bowl with olive oil for greasing the grill grates and for brushing the pizza. Prepare the toppings so they are ready to go on the pizza—tomato sauce, cheese, and anything else you wish.
  • Shape the pizza dough by flattening it with your hands on a slightly floured surface. Either use your fingers to stretch the dough out, or hold up the edges of the dough with your fingers, letting the dough hang and stretch, while working around the edges of the dough. Once you've stretched the dough, let it sit for 5 minutes and then push out the edges with your fingers again, until you have a nice round shape, about 12-inches in diameter. Do not make a raised rim, it will interfere with the grilling process.
  • Once the grill is hot (you can hold your hands an inch over the grates for no more than 2 seconds), dip a tightly folded up paper towel in olive oil and use tongs to wipe the grill grates. Then place a pizza dough round on a lightly floured (or you can use cornmeal) rimless cookie sheet (or pizza peel if you have one). Let the dough slide off the cookie sheet onto the hot grill grates. Close the lid of the grill and let cook for 2 minutes.
  • After 2 minutes, open the grill and check underneath the dough to see if it is getting browned. If it is on one side, but not another, use a spatula or tongs to rotate the dough 90 degrees and cook for another minute. If it is not beginning to brown, cover the grill and continue to cook a minute at a time until the bottom has begun to brown. It should only take a couple minutes if you have a hot grill. The top of the pizza dough will start bubbling up with air pockets.
  • Once the pizza dough has browned lightly on one side, use your cookie sheet or pizza peel to remove it from the grill. Use a spatula to flip the dough over so that the grilled side is now up. Keep the grill covered so it retains its heat for the next step.
  • Paint the grilled surface of the pizza with a little olive oil, then cover with 1/2-1 cup of Homewrecker BBQ sauce – no more, or you could end up with a soggy pizza. Sprinkle on your toppings, ending with Mozarella cheese (if using), and if using meat, put that over the cheese. Remember to go light on the toppings, or your pizza will be heavy and soggy.
  • Slide the topped pizza back onto the grill. If you are using a gas grill, reduce the heat. If working with a charcoal grill, close the vents on the cover almost all the way. Close the lid and cook for 2-3 minutes more, or until the bottom begins to char and the cheese is bubbly. Pull off the grate with a spatula onto a cutting board or other flat surface and let rest for a couple minutes before cutting into slices.
  • Slice and serve! (Is good with Ranch dressing as a dipper.)

Saturday, September 5, 2015

Chicken Avocado Lime Soup (low carb!)

Chicken Avocado Lime Soup

Ingredients:
1 1/2 lbs boneless skinless chicken breasts*
1 Tbsp olive oil
1 cup chopped green onions (including whites, mince the whites)
2 jalapeños, seeded and minced (leave seeds if you want soup spicy, omit if you don't like heat)
2 cloves garlic, minced
4 (14.5 oz) cans low-sodium chicken broth
2 Roma tomatoes, seeded and diced
1/2 tsp ground cumin
Salt and freshly ground black pepper
1/3 cup chopped cilantro
3 Tbsp fresh lime juice
3 medium avocados, peeled, cored and diced
Tortilla chips, monterrey jack cheese, sour cream for serving (optional)

Directions:
In a large pot heat 1 Tbsp olive oil over medium heat. Once hot, add green onions and jalapenos and saute until tender, about 2 minutes, adding garlic during last 30 seconds of sauteing. Add chicken broth, tomatoes, cumin, season with salt and pepper to taste and add chicken breasts. Bring mixture to a boil over medium-high heat. Then reduce heat to medium, cover with lid and allow to cook, stirring occasionally, until chicken has cooked through 10 - 15 minutes (cook time will vary based on thickness of chicken breasts). Reduce burner to warm heat, remove chicken from pan and let rest on a cutting board 5 minutes, then shred chicken and return to soup. Stir in cilantro and lime juice. Add avocados to soup just before serving (if you don't plan on serving the soup right away, I would recommend adding the avocados to each bowl individually, about 1/2 an avocado per serving). Serve with tortilla chips, cheese and sour cream if desired.

Saturday, August 29, 2015

Grilled Soft Shell Crab

Grilled Soft Shell Crab
Source: Monahan's Seafood

Ingredients

  • Soft Shell Crabs
  • Extra Virgin Olive Oil
  • Lemon Juice
  • Sale & Pepper to Taste

Instructions

Clean your soft shell crabs or have your fish monger do it for you.

Heat your grill and make sure it is clean and oiled. Brush the crabs with olive oil, season with salt & pepper and place them on the grill at a 45 degree angle so that the claws and legs are not hanging down below the grate. Grill the crabs for about 4 minutes per side. Remove to a platter and serve with lemon wedges and the dipping sauce of your choice: cocktail, tartar, peanut, etc

Saturday, August 22, 2015

Grilled Lobster Tail with Herb Butter.

It's my birthday - I feel like celebrating with steak and lobster!

Found a great resource for grilling lobster tails, they have a recipe for herb butter, sounds divine. May have to try it today!

It's from Amazing Food Recipies, check it out!

Handy Guide to Grilling Lobster Tails

Ingredients
  • 4 lobster tails, 7 oz each
  • 1 minced garlic clove
  • 2 tablespoons chopped chives
  • 1 stick salted butter, at room temperature
  • 1 tablespoon chopped tarragon leaves
  • Few drops hot sauce
  • Olive oil and salt, as needed
  • Black pepper, to taste
  • 4 lemon wedges, for garnish

Instructions

Preheat the grill to a direct medium-high heat.
  1. Blend the butter with the garlic, herbs, black pepper, and hot sauce, and then cover with plastic wrap.
  2. Butterfly the lobster tails down the middle of the shell's softer underside, using kitchen shears.
  3. Cut the meat down the middle but do not cut all the way through.
  4. Insert a metal skewer down the tail so it stays straight.
  5. Brush the tails with olive oil and add a little salt to each.
  6. Grill them cut side down for 5 minutes or until the shells are bright in color.
  7. Flip them over and spoon some of the herb butter on to the meat.
  8. Grill for 4 more minutes, or until the lobster is opaque.
  9. Serve with lemon wedges and more herb butter on the side.

Saturday, August 15, 2015

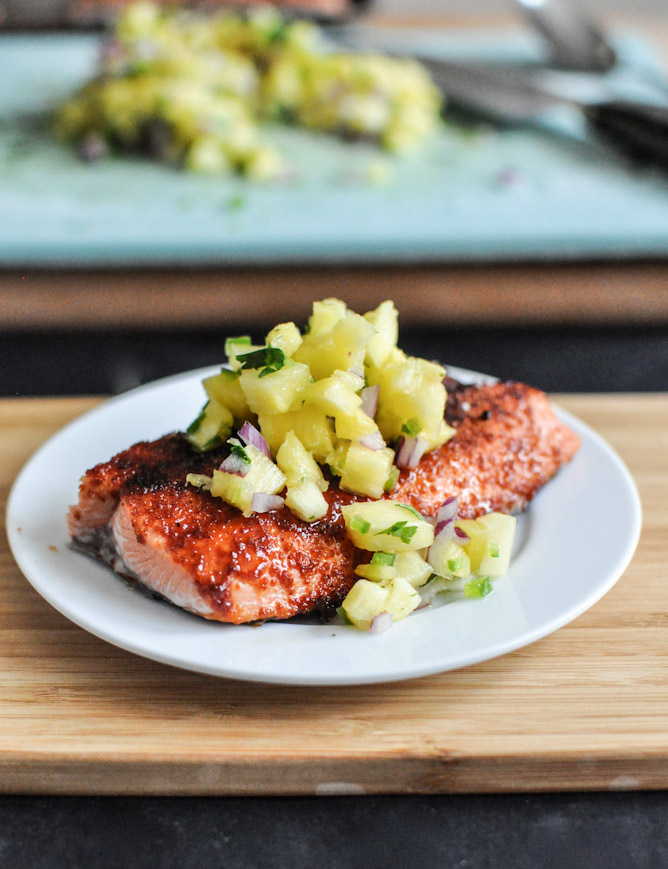
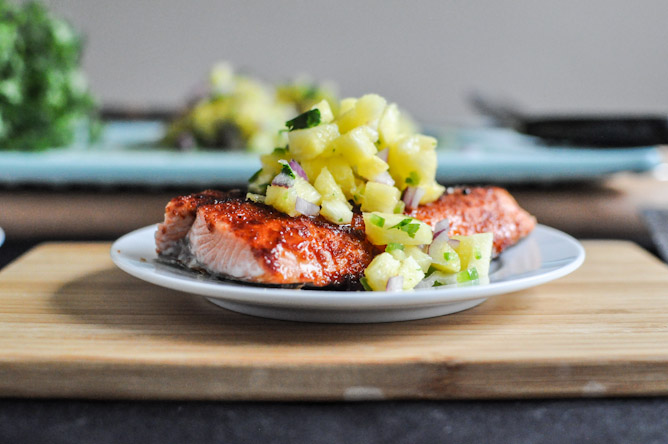
Grilled Homewrecker BBQ Rub Spiced Salmon with Pineapple Jalepeno Salsa

BBQ Spiced Salmon with Pineapple Jalapeño Salsa I howsweeteats.comGrilled Homewrecker BBQ Rub Spiced Salmon with Pineapple Jalapeno Salsa

Ingredients

Salmon:
1.5 pounds fresh salmon
4 oz Homewrecker BBQ Rub

Salsa:

1 1/2 cups pineapple chunks, cut into tiny cubes
1/2 jalapeño, seeded and chopped
1/4 red onion, finely chopped
3 tablespoons freshly chopped cilantro
1/4 teaspoon salt
1/4 teaspoon pepper
the juice of one lime
Combine all ingredients together and toss. Let sit for 30-60 minutes before serving if possible.

Instructions:

Saturday, August 8, 2015

Homewrecker BBQ GRILLED OYSTERS

Barbecued OystersHomewrecker BBQ Grilled Oysters

Ingredients

48 medium-sized oysters
1/2 cup (4 oz./125 g.) unsalted butter
6 cloves garlic, finely chopped
1/2 cup (4 fl. oz.) Homewrecker BBQ Sauce

Instructions

Scrub the oysters with a stiff brush under cold running water. To shuck each oyster, hold it, flat side up, in your non-dominant hand. (You might want to protect your hand from the sharp shell with a folded kitchen towel or a sturdy glove.) Find the hinge near the pointed end of the oyster, and insert the tip of an oyster knife about 1/2 inch (12 mm.) deep into the hinge. Twist the knife to break the hinge and loosen the top shell. Run the knife along the inside surface of the bottom shell to loosen the oyster, and leave the oyster in the shell. Place the oyster on a rimmed baking sheet or tray and repeat with the remaining oysters. Once all the oysters are shucked, return them to the refrigerator until the grill is ready.

Prepare a charcoal or gas grill for direct grilling over high heat. Brush and oil the grill grate.

In a small saucepan over medium heat, melt the butter. Add the garlic and BBQ sauce. Whisk to combine. Simmer for 5 minutes to blend the flavors, then remove from the heat.

Carefully place the oysters on the grill and quickly spoon a little of the sauce into each shell. Cover the grill and cook for about 5 minutes, or until the oysters are to your liking.

Using tongs, transfer the oysters to a platter and serve at once. Serves 4 as a main dish or 8 as an appetizer.

Saturday, August 1, 2015

Peach & Homewrecker BBQ Grilled Tilapia

Peach & Homewrecker BBQ Grilled Tilapia

Ingredients

  • 1 jar (12 ounces) peach preserves
  • 1 jar Homewrecker BBQ sauce
  • 4 Tilapia filets (you can do more if you need)
  • Homewrecker BBQ Rub (Mild, Original or Hot depending on your taste)

Instructions

  1. Combine the peach preserves and barbecue sauce in a saucepan over medium heat. Whisk together until boiling and then reduce heat and simmer for 5 minutes. 
  2. Season the tilapia on both sides. Set some barbecue sauce aside to reserve for dipping and then brush the fish on both sides with the barbecue sauce. Grill the fish on medium heat for about 3-4 minutes on each side, basting the fish with the barbecue sauce as it cooks.